
The rich aroma, the golden crema, the intense flavor—a perfect shot of espresso is a tiny cup of magic. But if you’ve ever felt intimidated by professional machines and jargon-filled tutorials, you’re not alone. The world of espresso can seem complex, but it doesn’t have to be.
This guide is designed for one person: you, the complete beginner. We will demystify espresso, walk you through the essential gear (without breaking the bank), and give you a clear, step-by-step process to pull your very first shot at home. Let’s turn your kitchen into your personal café.
Chapter 1: What is Espresso, Really?
Before we touch a machine, let’s understand what we’re trying to create.
A Simple Definition:
Espresso is a brewing method that forces hot water under high pressure through finely-ground coffee beans. This process results in a small, concentrated coffee beverage with a complex flavor and a layer of foam on top called “crema.”
It’s not a specific bean or roast level; it’s a method. While certain beans are roasted specifically to shine as espresso, the technique is what defines it.
Espresso vs. Other Coffees: The Key Differences
Many people wonder how espresso stacks up against their regular cup of joe. Here’s the breakdown:
- Brewing Method & Time: Your standard drip coffee is made by gravity slowly pulling hot water through coarser grounds, taking several minutes. Espresso, on the other hand, uses pressure (8-9 bars) to blast water through fine grounds in just 25-30 seconds. This speed and pressure are what create the concentration and signature crema.
- Grind Size: Espresso requires a much finer grind, similar to table salt. Drip coffee uses a medium grind, while French press uses a coarse grind. The fine grind creates the necessary resistance for the pressure to build up.
- Caffeine Content (The Big Myth!): A single shot of espresso has more caffeine than a cup of coffee, right? Wrong. Because a shot of espresso is only about 1 ounce (30ml), it contains approximately 63 mg of caffeine. A standard 8-ounce (240ml) cup of drip coffee has about 95 mg. So, ounce for ounce, espresso is stronger, but you typically drink a much smaller volume. You get a more concentrated caffeine kick in a short time.
- Flavor & Body: Drip coffee highlights the broader, more nuanced notes of the coffee. Espresso, due to the high-pressure extraction, delivers an intense, full-bodied, and complex flavor all at once. You taste the deep chocolaty, nutty, or fruity notes in a powerful, concentrated form.
Chapter 2: The Essential Home Espresso Setup: What You REALLY Need
You don’t need a $3,000 machine to start. Let’s break down the essential equipment into two categories: The Non-Negotiables and The Game Changers.
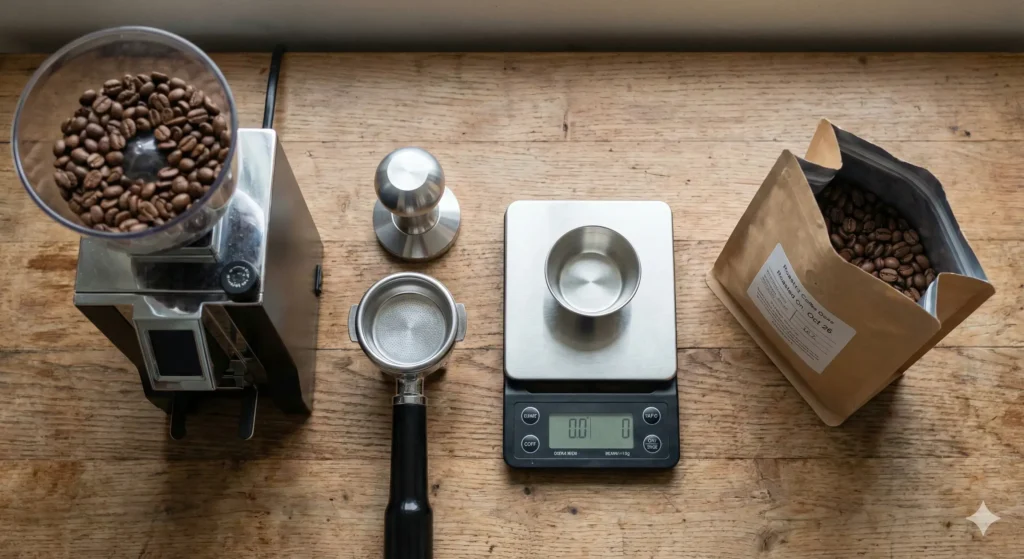
The Non-Negotiable Core Gear
1. The Espresso Machine
This is the heart of your operation. For beginners, you have two excellent starting points:
- Manual/Semi-Automatic Machines: These are the most common starter machines (e.g., Breville Bambino Plus, Gaggia Classic Pro). You grind the coffee, dose it, tamp it, and then press a button to start/stop the water flow. They offer the best balance of control and convenience, teaching you the fundamentals.
- Fully Automatic Machines: These machines (e.g., models from De’Longhi or Jura) do almost everything for you at the push of a button—grinding, tamping, and brewing. They are great for sheer convenience but offer less hands-on control.
2. The Coffee Grinder (This is MORE Important Than You Think)
If you invest in one thing after the machine, make it a good grinder. Pre-ground coffee will not work for espresso. It’s not fine enough, lacks freshness, and you cannot adjust it. The grind size is the single most critical variable for pulling a good shot.
- Burr Grinder vs. Blade Grinder: You need a burr grinder. Blade grinders chop beans inconsistently, creating a mix of fine powder and coarse chunks that will ruin your espresso. Burr grinders crush beans between two surfaces, creating a uniform, consistent grind, which is essential for even extraction.
- Types for Beginners: A good-quality electric burr grinder with adjustable settings (like the Baratza Encore ESP or Eureka Mignon Notte) is a perfect start.
3. Fresh, High-Quality Coffee Beans
You can’t make great espresso with stale, low-quality beans. Look for beans that are roasted for espresso (typically a medium to dark roast, but this is flexible). Most importantly, check the roast date. Beans are at their peak for espresso within 3-6 weeks of the roast date. Avoid bags with only a “best by” date.
The “Game Changer” Accessories
These aren’t strictly essential for pulling your first shot, but they will dramatically improve your consistency and quality as you progress.
- Scale (0.1g Precision): This is the #1 tool for consistency. Measuring your coffee input and espresso output by weight, not volume, is a professional practice that eliminates guesswork.
- Tamper: Most beginner machines come with a cheap, plastic tamper. A good, heavy, metal tamper that fits your portafilter basket perfectly will allow you to apply even pressure—a key to avoiding channeling (where water finds easy paths through the coffee).
- Knock Box: A simple container to knock out your used coffee puck after brewing. It keeps your workspace clean.
- Milk Jug: If you plan on making lattes or cappuccinos, a stainless steel milk jug with a spout is essential for steaming and pouring.
Chapter 3: Your First Shot: A Step-by-Step Walkthrough
Follow these steps carefully. It might feel mechanical at first, but it will soon become a satisfying ritual.
Step 1: Preheat Your Machine
Turn on your espresso machine and let it heat up fully. This can take 5-20 minutes depending on the model. Run a blank shot (without coffee) through the portafilter to heat up the group head and your cup. A cold machine will result in under-extracted, sour espresso.
Step 2: Weigh and Grind Your Beans
Using your scale, weigh out 18-20 grams of coffee beans. This is a standard starting dose for a double shot. Grind them to a fine consistency. Your goal is a grind that feels like fine sand or table salt.
Pro Tip: Before tamping, tap the portafilter once on the counter to settle the grounds. This simple trick prevents air pockets!
Step 3: Dose and Distribute
Place your portafilter on the scale and tare it to zero. Add your ground coffee. Use your finger to gently distribute the grounds evenly in the basket, breaking up any clumps. An uneven bed will lead to uneven extraction.
Step 4: Tamp Evenly and Firmly
Place the portafilter on a stable surface. Hold your tamper like a doorknob, and press straight down with firm, even pressure. You’re not trying to crush the coffee, just compress it into a uniform puck. Apply pressure until you feel significant resistance, then give a gentle polish twist. The goal is a level, compact puck.
Step 5: Pull the Shot & Time It
Lock the portafilter into the group head. Place your preheated cup on the scale and tare it. Start the shot immediately.
- The Golden Ratio: You are aiming for a 1:2 ratio. This means for every gram of coffee in, you want 2 grams of liquid espresso out.
- Example: 18g of coffee in → 36g of liquid espresso out.
- The Magic Time Window: This extraction should take 25-30 seconds. Start timing from the moment the first drop hits the cup.
If your shot runs too fast (<25 seconds), it will be under-extracted and taste sour/watery. Your grind is too coarse.
If your shot runs too slow (>35 seconds), it will be over-extracted and taste bitter/harsh. Your grind is too fine.
Step 6: Observe and Enjoy!
You should see a rich, golden-brown crema on top of your espresso. This is a sign of fresh beans and good technique. Give it a stir to incorporate the crema with the espresso underneath (this balances the flavor), and taste your creation!
Chapter 4: Troubleshooting Your First Shots
When I first started, I wasted 3 bags of coffee because I didn’t believe the grinder mattered. Don’t make my mistake. Don’t worry if your first shot isn’t perfect. Here’s how to diagnose and fix common problems.
Problem: The shot is SOUR and sharp.
- Diagnosis: Under-extraction. The water passed through the coffee too quickly, only grabbing the bright, acidic flavors.
- Solution: Make your grind finer. This will slow down the shot time.
Problem: The shot is BITTER and harsh.
- Diagnosis: Over-extraction. The water was in contact with the coffee for too long, pulling out the unpleasant, bitter compounds.
- Solution: Make your grind coarser. This will speed up the shot time.
Problem: No crema, or it disappears quickly.
- Diagnosis: The beans are stale, the grind is too coarse, or you didn’t use enough coffee.
- Solution: Use fresher beans, grind finer, or increase your dose slightly.
Problem: Espresso sprays or comes out from multiple points.
- Diagnosis: Channeling. Water is finding weak spots in the coffee puck instead of passing through evenly.
- Solution: Improve your distribution before tamping and ensure you are tamping evenly.
Chapter 5: Beyond the Straight Shot: Your Next Steps
Congratulations! You’ve pulled your first shot. Now, the world of coffee drinks awaits.
- Americano: A shot of espresso topped with hot water. Similar strength to drip coffee but with an espresso flavor profile.
- Cappuccino: Equal parts espresso, steamed milk, and milk foam.
- Latte: A shot of espresso with mostly steamed milk and a small layer of microfoam on top.
Mastering your straight shot is the first and most important step. Once you have that down, you can start learning to steam milk to create these beloved café classics.
Your Home Barista Journey Starts Now
Making espresso at home is a rewarding skill. It’s part science, part art, and entirely enjoyable. There will be mishaps—strange-tasting shots, messy counters, and moments of frustration. But the moment you pull that first balanced, delicious shot that you created, it will all be worth it.
Remember the key takeaways: start with fresh beans, invest in a good grinder, and use a scale for consistency. Don’t be afraid to experiment. Adjust your grind, dose, and yield to suit your personal taste.
The path to becoming a home barista is an exciting one. So, fire up your machine, and start pulling shots. Your perfect espresso is waiting.